Installing Operating System
KICKPI K7S_K7F has on-board eMMC and boots from eMMC directly. If you need to replace the system on eMMC or want to sideload another OS from other storage devices (e.g., TF card), please read this chapter and proceed.
Obtaining Image
Obtain KICKPI K7S_K7F image files from OnDrive.
├── Android14       // Android 14 Tablet Desktop Image
├── Armbian         // Armbian Ubuntu2404 Image
├── Debian12        // Debian12 xfce Desktop Image
└── Ubuntu2404      // Ubuntu2404 xfce Desktop Image
Android, Ubuntu, Debian Image Installation
Warning
Android, Ubuntu, and Debian systems share the same installation method. Armbian image differs from Rockchip's official image format and cannot be installed using the same method. For Armbian Image Installation, please read the separate section below.
USB Installation
Install OS Image to the on-board eMMC via USB TYPE-C or USB TYPE-A (To boot from TF card or install Image into eMMC via TF card, please read SD Installation).
Hardware Installation
- Hardware: Windows PC/laptop, DC 12V/1.5A power adapter, HDMI display (optional), USB TYPE-C (ensure host has TYPE-C port) or USB TYPE-A data cable (some cheap TYPE-C cables only provide current, make sure to use one capable of data exchange). Some users reported that when using TYPE-C to TYPE-C cable, installation fails occasionally; switching to USB-A to TYPE-C cable works fine.
Tip
FPC Antenna has bare metal surface, should avoid direct contact with the board. The antenna may also generate electromagnetic interference, harming DDR signals. Please place the antenna spatially away from DDR and SoC.


Installation Steps
- Download USB driver DriverAssiant, open DriverInstall.exe in the extracted folder.

- Download RKDevTool, open RKDevTool.exe in the extracted folder.

- Connect board and PC with USB TYPE-C cable, put board into MASKROM mode, RKDevTool will detect a MASKROM device.
Note
MASKROM mode entry:
When board is powered off, press and hold the MASKROM button on the back of the board (don't let loose), apply power. The green LED will be steady on, release the MASKROM button, connect the USB cable, the flashing tool will detect a MASKROM device.
When board is powered on, press and hold the MASKROM button on the back of the board (don't let loose), then short press the RESET button once, the flashing tool will detect a MASKROM device, release the MASKROM button.

- Select image file and flash.
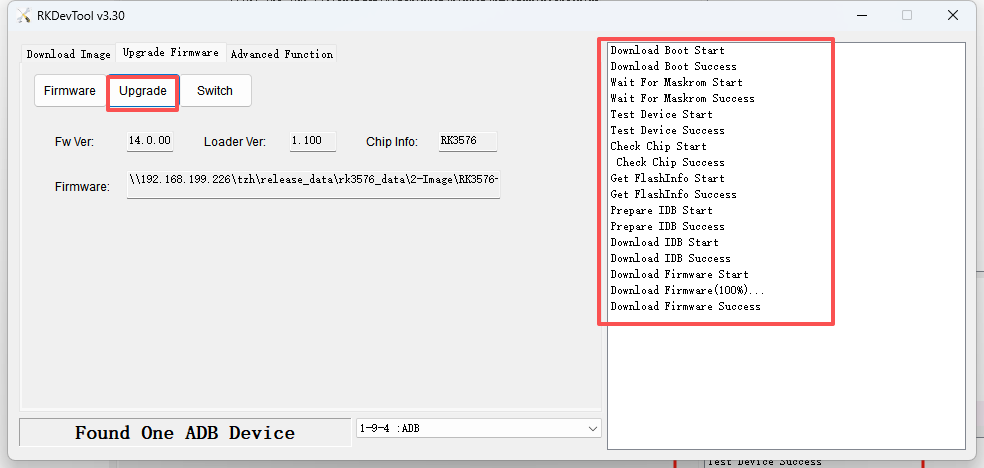
1. Click Upgrade Firmware to switch to the firmware upgrade tab, click Firmware, select the target image update-*.img to install.

2. Click Upgrade, wait for flashing to complete.
Success
If the board is connected to a display, do not power off immediately after flashing completes, the system will boot automatically. Wait for the board to show the desktop.
If installing without a display, do not power off immediately after flashing completes, the system will boot automatically. Check the LED status: green LED steady on, blue LED keeps blinking!
SD Installation
K7S_K7F has a SD card slot (microSD aka. TransFlash or TF) which can also serve as a bootable device. In K7S_K7F's boot sequence, SD card has higher priority, so the device always tries to boot from SD card first; when no mountable SD card is detected, it then boots from on-board eMMC. Since SoC vendor's official tools use terminology SD (microSD) instead of TF, we use SD card in this context, TF and SD mean the same thing.
With SoC vendor's tool, we can make 2 types of booting cards. SD Boot Card works like a portable edition OS (e.g., Windows PE). It is used to power the device for maintenance and repair purposes, and can also be used to verify your own customizations. The second type is SD Installation Card. You create this kind of booting card when you want to use it to install a new Image into on-board eMMC. It contains a specific script to create partitions, format FS, and copy files to eMMC. Make sure you understand what you need and create the right SD card.
Note
Supported SD card filesystem formats: exfat, NTFS
SD Boot Card (SD Boot): Contains bootloader and complete system image, supports device booting directly from TF card, used in scenarios like on-board storage failure, development debugging.
SD Installation Card (Upgrade Firmware): Stores firmware image and installation script, used to install or upgrade firmware to the device's on-board storage (e.g., eMMC).
Steps
- Download SDDiskTool, open SD_Firmware_Tool.exe in the extracted folder, insert TF card into your PC.
Note
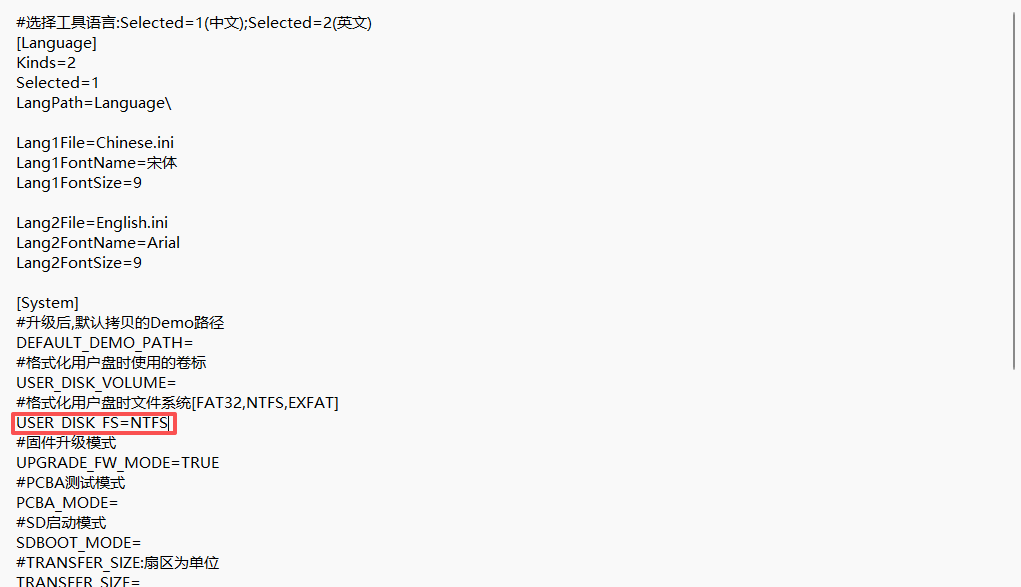
SDDiskTool default display language is Chinese. To change to English, find the config.ini file as shown below, change Selected=1 under [Language] to Selected=2, save, and restart SDDiskTool.

SD Boot Card
When both on-board eMMC and the SD Boot Card contain OS systems, the system boots from SD card by default.
eMMC erase
Note
When the on-board eMMC has been pre-installed with the Android operating system, and the SD card has been flashed with another Linux system and you attempt to boot from the SD card, the boot process will fail. The reason is that the device's boot procedure prioritizes booting into the U-boot bootloader on the on-board eMMC — when no mountable SD card is detected, the device directly loads the kernel and rootfs from the on-board eMMC; when an external SD card is detected, the U-boot on the on-board eMMC will try to transfer control to the U-boot on the SD card. However, the Linux system comes with a different version of the bootloader (U-boot), which is incompatible with the U-boot version on the on-board eMMC, and the latter cannot load the Linux's U-boot. In this case, we need to erase the existing system on the on-board eMMC.
Steps
1. Download USB driver DriverAssiant, open DriverInstall.exe in the extracted folder.
2. Run RKDevTool, power off board, press and hold RECOVERY button (don't let loose), power on. When RKDevTool status bar shows Found One LOADER Device, release RECOVERY button.

3. Choose Advanced Function tab, click EraseAll. This action will erase data from on-board eMMC.

4. Left text view shows erased.

Step1. Create SD Boot Card
1. Select the SD card.
2. Select SD Boot.
3. Download image, click Firmware to select the installation image update-*.img file.
├── Android14       // Android 14 Tablet Desktop Image
├── Armbian         // Armbian Ubuntu2404 Image
├── Debian12        // Debian12 xfce Desktop Image
└── Ubuntu2404      // Ubuntu2404 xfce Desktop Image
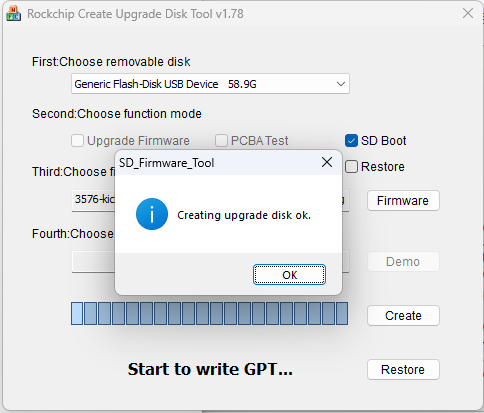
4. Click Create SD Boot Card, please wait patiently for the TF boot card creation to complete.
Note
During the creation of the TF boot card, SDDiskTool will ask whether to format the TF card. If TF card formatting succeeds, it may prompt "burning failed" — simply recreate the card.
If SDDiskTool shows formatting failure, please read the Q&A section below.

5. TF boot card creation completed.
6. Power off the board, connect the display and insert the SD boot card, power on again, check whether the system boots into the desktop normally.
Note
During the first boot, the display may stay on the ROCKCHIP KERNEL LOGO screen for a long time (approximately 2~5 minutes). The display may also turn off and on repeatedly during this time, which is normal. Please wait patiently for the system to boot into the desktop.
SD Installation Card
Note
The OS image on the SD Installation Card will automatically overwrite the image on eMMC.
If SDDiskTool shows formatting failure, please read the Q&A section below.
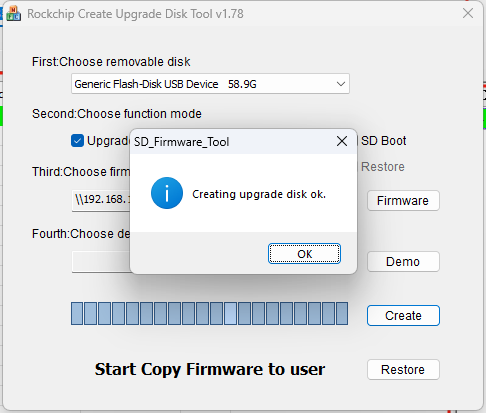
1. If your SD card is larger than 16GB, you may encounter installation failure. Please modify SDDiskTool_v1.74/config.ini, specify the format as NTFS, save, and restart SDDiskTool.
2. Follow the steps shown in the diagram below.

3. SD Installation Card creation completed.
4. Power off the board, connect the display and insert the TF Installation Card, power on again. The display will show an installation progress bar and text like "check userdata/oem partition success".
Success
When installation is done, the display will show "Please remove SD CARD!!!, wait for reboot". At this point, remove the SD card, wait for the system to reboot (for the first system boot, do not power off immediately, wait for the system to boot into the desktop normally).
When no display is connected, after both the blue and green LEDs are steady on, remove the TF card. The board will automatically reboot, and the blue LED will keep blinking.
Armbian Image Installation
Obtaining Armbian Image
Download KICKPI K7S_K7F image from OnDrive.
USB Installation
Install Armbian image to on-board eMMC via USB TYPE-C or USB TYPE-A (To boot Armbian system from SD card, please read SD Boot Card).
Hardware Installation
- Hardware: DC 12V, HDMI display (optional), USB TYPE-C or USB TYPE-A
Tip
Connecting a display makes it easier to observe whether the image flashing is successful. K7 supports multiple display connections, only HDMI connection is demonstrated here.

Installation Steps
- Download USB driver DriverAssiant, open DriverInstall.exe in the extracted folder.
- Download RKDevTool, open RKDevTool.exe in the extracted folder.
- Connect board and PC with USB TYPE-C cable, put board into MASKROM mode, RKDevTool will detect a MASKROM device.
Note
MASKROM mode entry:
When board is powered off, press and hold the MASKROM button (don't let loose), apply power. The green LED will be steady on, release the MASKROM button, connect the USB cable, the flashing tool will detect a MASKROM device.
When board is powered on, press and hold the MASKROM button (don't let loose), then short press the RESET button once, the flashing tool will detect a MASKROM device, release the MASKROM button.
- Unlike Android and other Linux distros, Armbian cannot be installed simply as a whole image. Please read the following details.
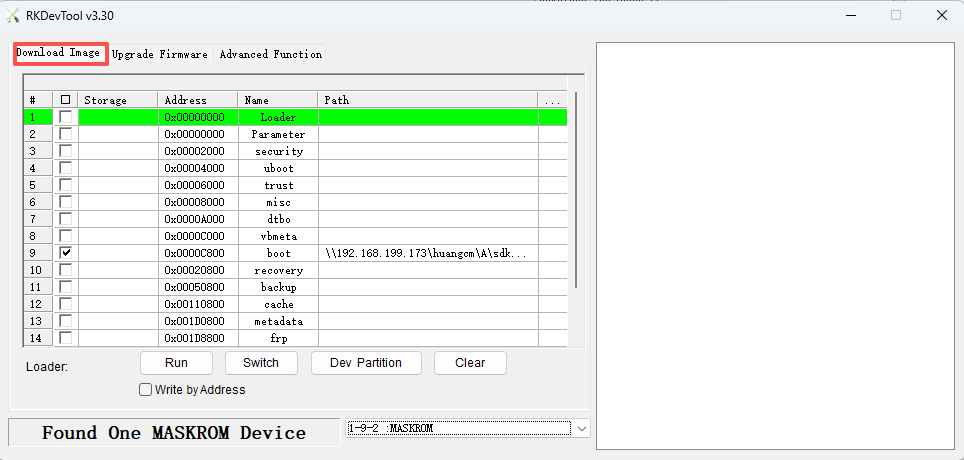
1. Click Download Image tab. You can see many partitions in the partition table area, e.g., Loader, Parameter, etc.
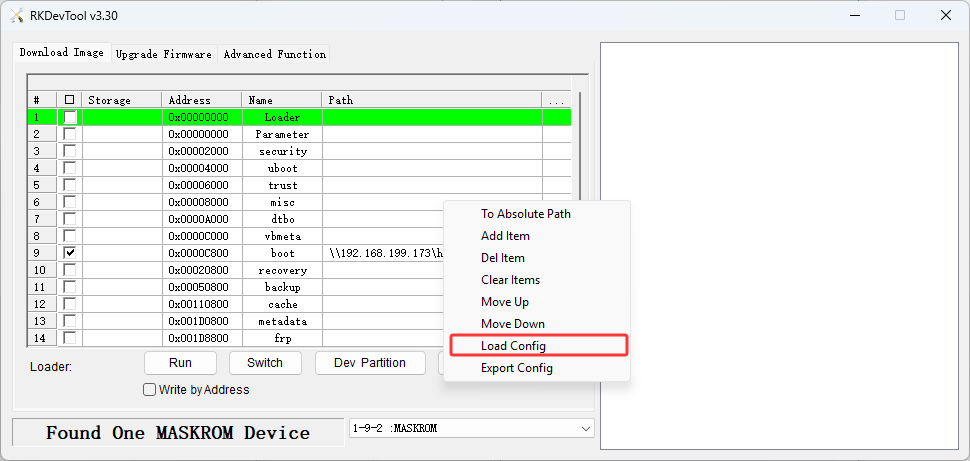
2. Right-click anywhere inside the partition table area to open the pop-up menu. In the menu, click Load Config, and then select the armbian_*.cfg file.
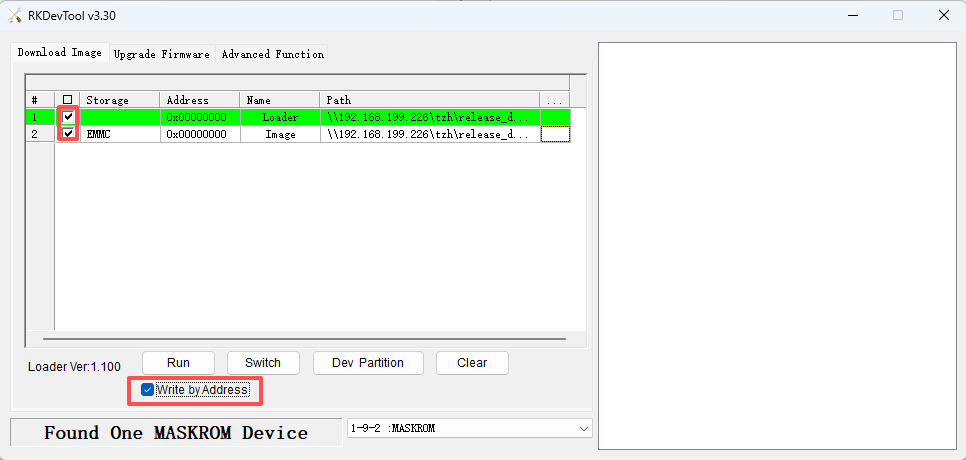
3. After loading config to apply armbian.cfg, the partition table area changes to reflect the config inside armbian.cfg, leaving only two partitions (Loader and Image). We need to specify img/bin for each partition. First, specify img/bin for the loader partition: click the area marked (1), select the MiniLoaderAll_rk3576.bin file.

4. Select the Image partition configuration: click the area marked (2), select the Armbian-*.img image file.

5. Check both lines' checkboxes as shown in the diagram and also check the Write by Address option (Must be checked!).
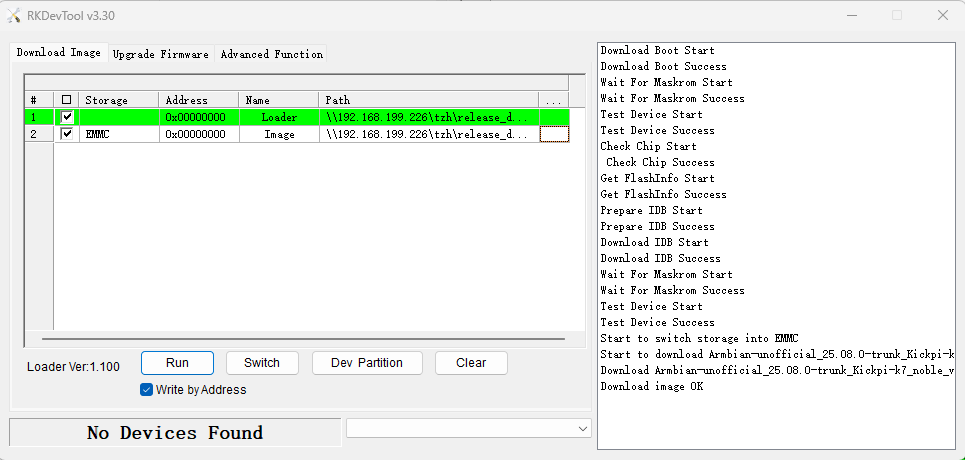
6. Click Run, wait for installation to complete, and check whether the Armbian desktop appears on the display.
Success
If the board is connected to a display, the board will reboot automatically after installation is done. Wait for the display to show the system desktop.
If installing without a display, you can't see the reboot process. Check the LED status: green LED steady on, blue LED keeps blinking! During installation, blue LED is off all the time. So when it starts blinking, it means the board has rebooted.
SD Boot Card
eMMC Erase
Note
When on-board eMMC has already been installed with other OS (e.g., Ubuntu, Debian, Android), and the SD card has been flashed with Armbian and you need to boot from SD, it will fail. The reason is that the boot procedure will first boot into on-board eMMC's U-boot. When no SD card is mounted, the board directly loads on-board eMMC's kernel and rootfs. When an external SD card is mounted, on-board eMMC's U-boot will try to transfer control to U-boot on the SD card. But Armbian has the newest bootloader (U-boot) version which is not compatible with the older version U-boot on the on-board eMMC. The older version U-boot cannot load Armbian's U-boot. In this case, we need to erase the on-board eMMC's system.
1. Download USB driver DriverAssiant, open DriverInstall.exe in the extracted folder.
2. Run RKDevTool, power off board, press and hold RECOVERY button (don't let loose), power on. When RKDevTool status bar shows Found One LOADER Device, release RECOVERY button.
3. Choose Advanced Function tab, click EraseAll. This action will erase data from on-board eMMC.
4. Left text view shows erased.
Step1. Create SD Boot Card
Preparation
- Hardware: TF card (recommended capacity ≥16GB), TF card reader
- Software: Imaging tool balenaEtcher, Armbian image
Steps
1. Connect Storage Card: Insert the SD card into your computer via a card reader.
2. Launch Software: Open the installed balenaEtcher as Administrator.
3. Select Image: Click "Flash from file", select the downloaded Armbian-*.img system image file.
4. Select Target: Click "Select target drive", choose the SD card device you just inserted.
5. Start Flashing: After confirming the information is correct, click "Flash!".

6. Installation Complete: Wait for the program to automatically complete verification and prompt success, then close the window.
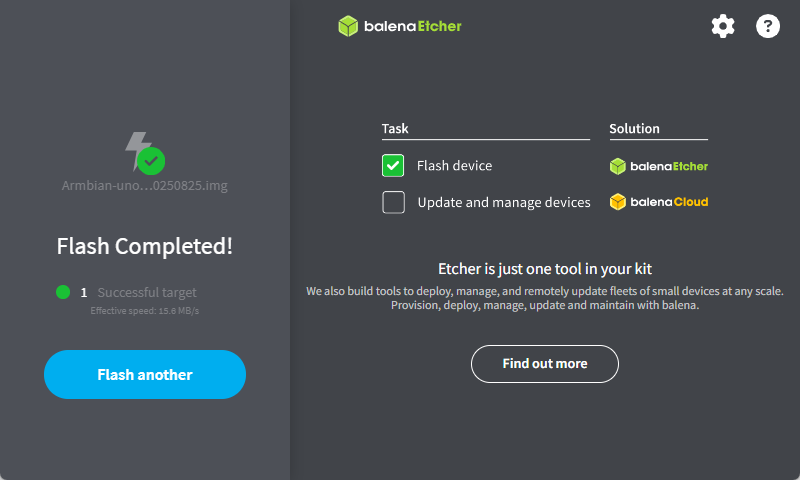
If the image is undamaged and the situation shown in the diagram occurs, the issue may be poor USB port contact. Please replace the USB port and try again.

Step2. Boot Device Using SD Card
Note
First Boot Guide
1. Be Patient: After the first power-on, the system will automatically perform initialization configuration. Do not power off or restart during this process.
2. Completion Sign: When the screen displays the graphical desktop or command-line login prompt, it indicates boot is complete and ready for use.
1. Power Off Device: Ensure your target board or device is completely powered off.
2. Insert Boot Card: Insert the created TF boot card into the corresponding slot on the device's board.
3. Power On and Boot: Apply power to the device, the system will begin booting from the TF card.
4. Wait for Boot Completion: The system will boot normally. The first boot may take several minutes for initialization, please wait patiently for the system to enter the desktop.