Linux QT Environment Setup
QT Runtime Environment Test
Ubuntu 20.04
Ubuntu 20.04 comes with QT 5.12.8 runtime environment by default.
1. Check QT libraries
2. Copy the demo to any directory on the system and test:
Debian 11
Debian 11 comes with QT 5.15.2 runtime environment by default.
1. Check QT libraries
2. Copy the demo to any directory on the system and test:
QT Cross-Compilation Environment Setup
Test platform: Ubuntu 20.04 VM
GCC Cross-Compilation Toolchain
- SDK Built-in Cross-Compilation Toolchain
Toolchain path (not recommended due to potential version incompatibilities):
- Install GCC Cross-Compilation Toolchain
Download the GCC cross-compilation toolchain, extract the archive to the VM. -C /opt/gcc-arm specifies the extraction path.
- Environment Variable Configuration
1. Add the toolchain installation path to environment variables so the system can locate it.
Temporary (current terminal session only):
Permanent:
2. Verify installation
Check if the toolchain is successfully installed and configured:
Successful installation shows output similar to:
aarch64-none-linux-gnu-gcc (GNU Toolchain for the A-profile Architecture) 9.2.1 20191203
Copyright (C) 2019 Free Software Foundation, Inc.
This is free software; see the source for copying conditions.  There is NO
warranty; not even for MERCHANTABILITY or FITNESS FOR A PARTICULAR PURPOSE.
qmake Installation
In Qt projects, qmake generates Makefiles from .pro project files. To install QT on the development board, install GCC and the source code directly without modifying compilation tools.
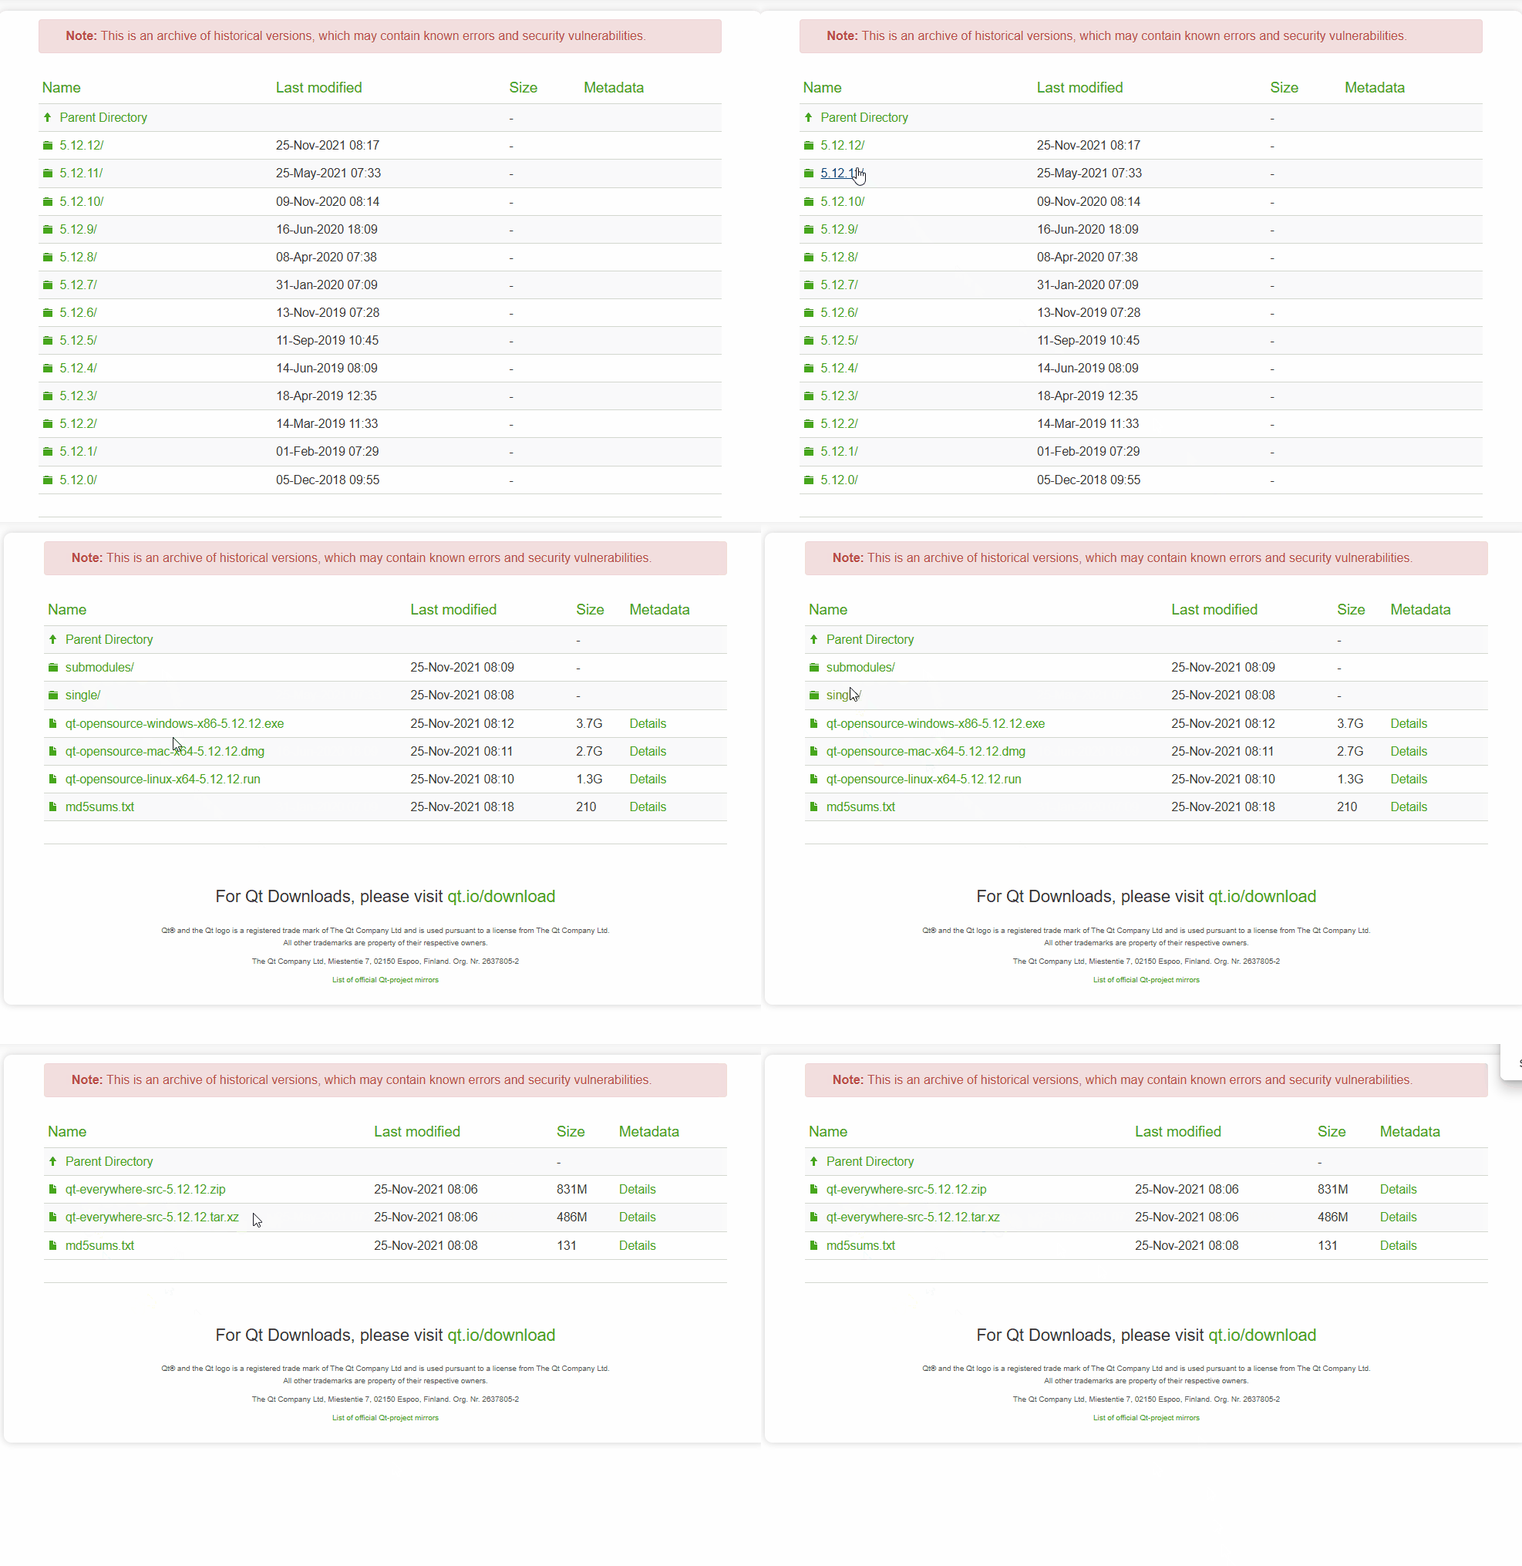
1. Download Qt / Or download the latest Qt from the official website (Historical versions: Qt Downloads)
Official website download steps:
2. Install required dependencies and toolchain
$ sudo apt-get install build-essential perl python3 git
$ sudo apt-get install '^libxcb.*-dev' libx11-xcb-dev libglu1-mesa-dev libxrender-dev libxi-dev libxkbcommon-dev libxkbcommon-x11-dev
$ sudo apt-get install flex bison gperf libicu-dev libxslt-dev ruby
$ sudo apt-get install libxcursor-dev libxcomposite-dev libxdamage-dev libxrandr-dev libxtst-dev libxss-dev libdbus-1-dev libevent-dev libfontconfig1-dev libcap-dev libpulse-dev libudev-dev libpci-dev libnss3-dev libasound2-dev libegl1-mesa-dev gperf bison nodejs
$ sudo apt-get install libasound2-dev libgstreamer1.0-dev libgstreamer-plugins-base1.0-dev
$ sudo apt-get install libgstreamer-plugins-bad1.0-dev
$ sudo apt install clang libclang-dev
$ sudo apt-get install xz-utils
$ sudo ln -s /usr/bin/python3 /usr/bin/python
3. Extract the downloaded Qt to the /opt folder
Enter the extracted folder and create an auto.sh script file
#!/bin/bash

./configure \
    -prefix /opt/Qt/ \
    -opensource -confirm-license \
    -nomake examples \
    -nomake tests \
    -release \
    -xplatform linux-aarch64-gnu-g++ \
    -device-option CROSS_COMPILE=/opt/gcc-arm/bin/aarch64-none-linux-gnu- \
    -no-eglfs \
    -no-xcb \
    -no-opengl \
    -skip qt3d \
    -skip qtcharts \
    -skip qtandroidextras \
    -skip qtlocation \
    -skip qtmultimedia \
    -skip qtsensors \
    -skip qtserialbus \
    -skip qtserialport \
    -skip qtwayland \
    -skip qtdeclarative \
    -skip qtxmlpatterns \
    -skip qtwebchannel \
    -skip qtwebengine \
4. Modify the qmake.conf file
Note
The qtbase/mkspecs/ directory in the Qt source contains configurations for different platforms. This example uses the qmake configuration in the linux-aarch64-gnu-g++ directory. Since the cross-compilation toolchain differs, modify qmake.conf to adapt to the cross-compilation tool in use.
# modifications to g++.conf
QMAKE_CC                =/opt/gcc-arm/bin/aarch64-none-linux-gnu-gcc
QMAKE_CXX               =/opt/gcc-arm/bin/aarch64-none-linux-gnu-g++
QMAKE_LINK              =/opt/gcc-arm/bin/aarch64-none-linux-gnu-g++
QMAKE_LINK_SHLIB        =/opt/gcc-arm/bin/aarch64-none-linux-gnu-g++

# modifications to linux.conf
QMAKE_AR                =/opt/gcc-arm/bin/aarch64-none-linux-gnu-ar cqs
QMAKE_OBJCOPY           =/opt/gcc-arm/bin/aarch64-none-linux-gnu-objcopy
QMAKE_NM                =/opt/gcc-arm/bin/aarch64-none-linux-gnu-nm -P
QMAKE_STRIP             =/opt/gcc-arm/bin/aarch64-none-linux-gnu-strip
5. Run the script to cross-configure Qt source, execute ./configure
Note
./configure options:
-prefix /opt/Qt/: Qt installation path
-opensource -confirm-license: Install Qt open-source edition
-nomake examples: Skip building Qt example programs
-nomake tests: Skip building Qt test cases and framework
-release: Build Qt in Release mode
-xplatform: Specify the target platform for Qt compilation
-qtlocation: Full cross-platform location service solution
-qtwebengine: High-performance web rendering engine based on Chromium
-skip: Skip compiling specified Qt modules
If location services or web rendering features are not needed, use -skip to exclude qtlocation and qtwebengine modules. This significantly reduces compilation time.
- Run compilation. Compilation takes approximately 4-12 hours.
After compilation completes, run the following command to install the program to the path specified by -prefix (/opt/Qt/).
7. After successful installation, modify environment variables
export QTDIR=/opt/Qt
export PATH=$QTDIR/bin:$PATH
export MANPATH=$QTDIR/man:$MANPATH
export LD_LIBRARY_PATH=$QTDIR/lib:$LD_LIBRARY_PATH
8. Check version
qtcreator Installation
Tip
Installing qtcreator requires Qt to be installed first. Various installation methods are available. Choose the appropriate one for your situation.
Install via Package
Tip
Install qtcreator in the VM.
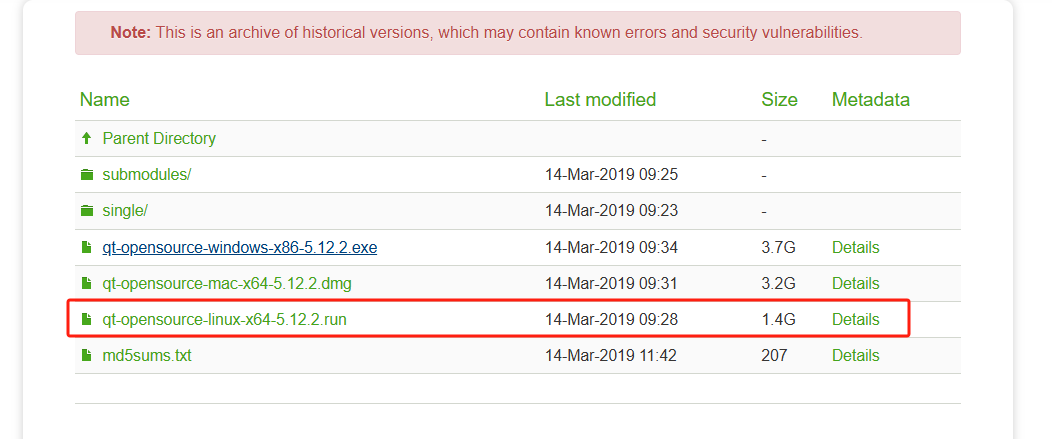
1. Go to the Qt official website and select the installation package.
2. Run the installer in the VM
Tip
A Qt account registration is required. The installation process is graphical, similar to Windows installation.
Install via apt
Tip
Install qtcreator directly on the development board.
Installing qtcreator via apt may result in a version mismatch with the installed Qt.
Install from Source
Tip
Install qtcreator in the VM. Only use this method if a specific version of Qt Creator is required (not recommended). Use a Qt Creator version that matches your Qt framework version.
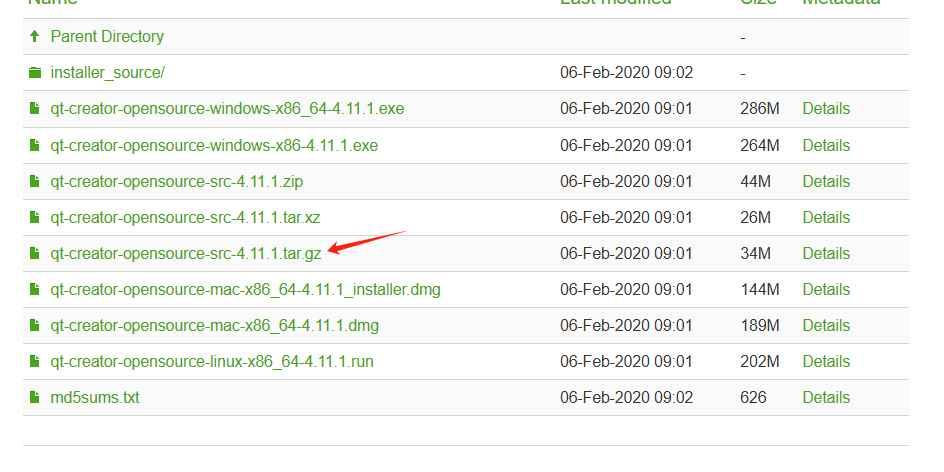
1. Download Qt Creator source code
2. Extract the archive, enter the extracted directory, and run:
3. After the above command generates the Makefile, run the compilation:
4. After compilation completes, run:
5. The bin directory contains qtcreator and qtcreator.sh. Run the following command to start qtcreator in the background, then configure qtcreator as needed.
Kit Configuration
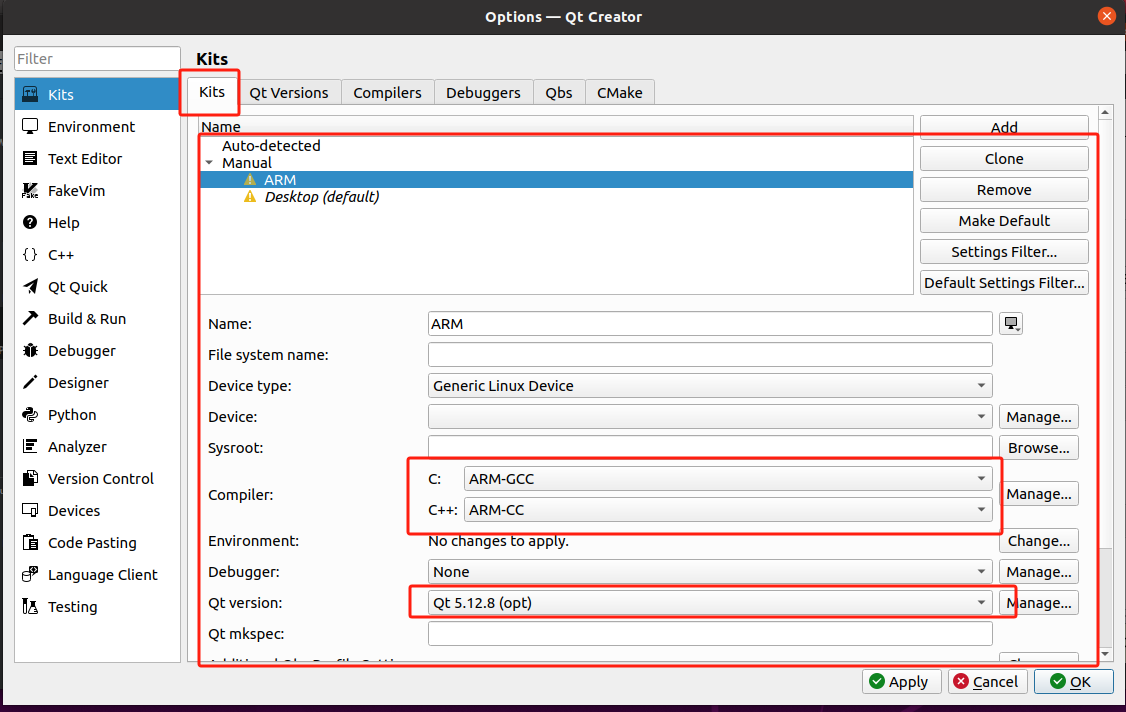
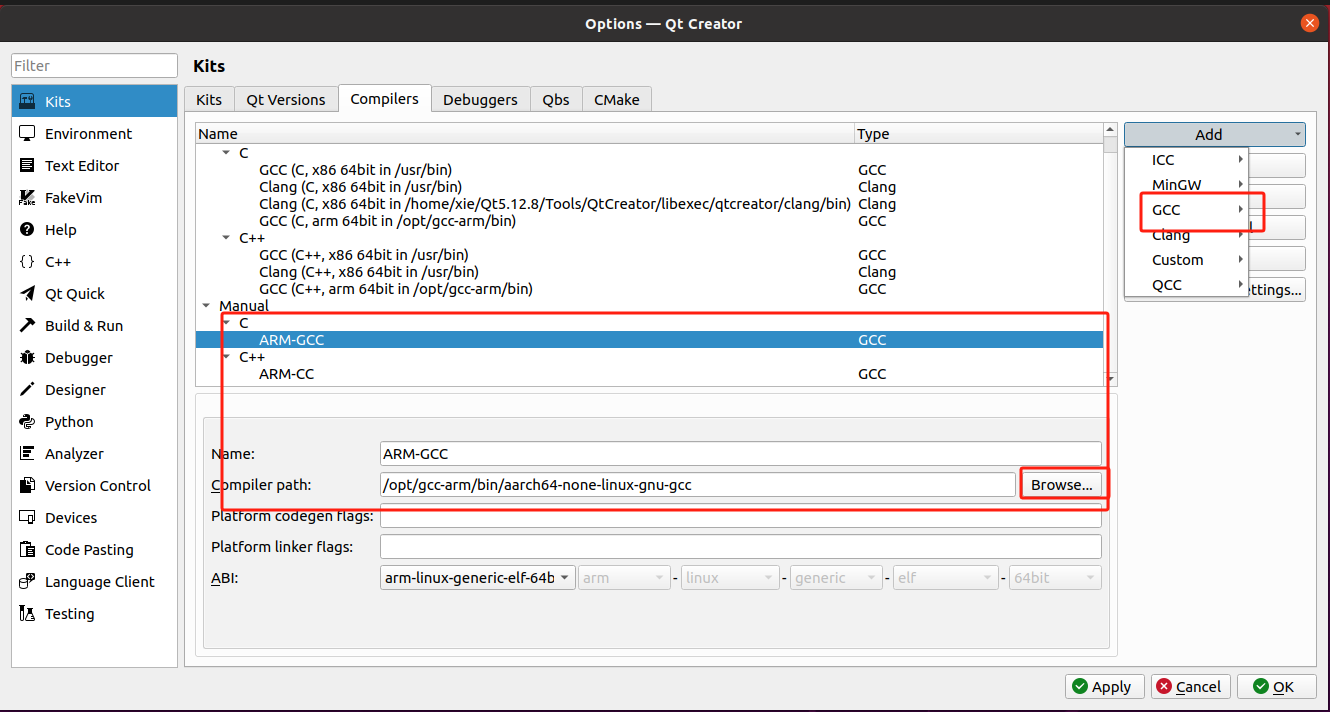
1. Add C Compiler and C++ Compiler in GCC settings
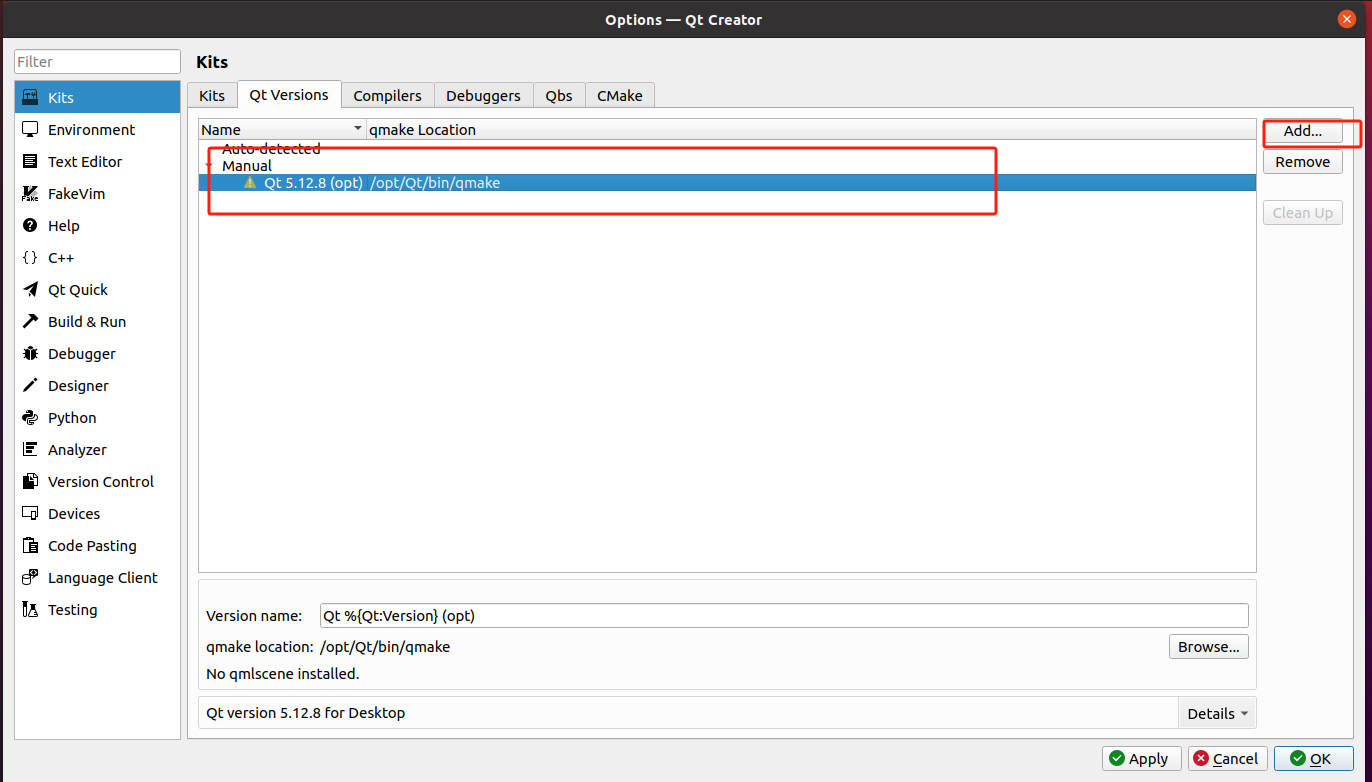
2. Add qmake
3. Configuration complete