Installing Operating System
By default, RK3576 Series Board has on-board eMMC and boots from eMMC directly. If you need to replace the system on eMMC or want to sideload another OS from other storage devices (e.g., microSD card), please read this chapter and proceed.
Tip
In this chapter, the Kickpi K7 is used as an example to demonstrate the image installation operations.
Warning
The Android system currently does not support booting from a TF card.
Obtaining Image
Obtain RK3576 Series image files from OneDrive.
├── Android14       // Android 14 Tablet Desktop Image
├── Armbian         // Armbian Ubuntu2404 Image
├── Debian12        // Debian12 xfce Desktop Image
└── Ubuntu2404      // Ubuntu2404 xfce Desktop Image
Warning
Android, Ubuntu, and Debian systems share the same installation method while Armbian is an exception. Armbian image differs from the official Rockchip image format and cannot be installed using the same way. Please read next Chapter install Armbian image to lean more.
Android, Ubuntu, Debian Image Installation
USB Installation
Install OS Image to the on-board EMMC via USB TYPE-C ( Booting from SD card or install Image into eMMC via SD card, please read SD Card installation.
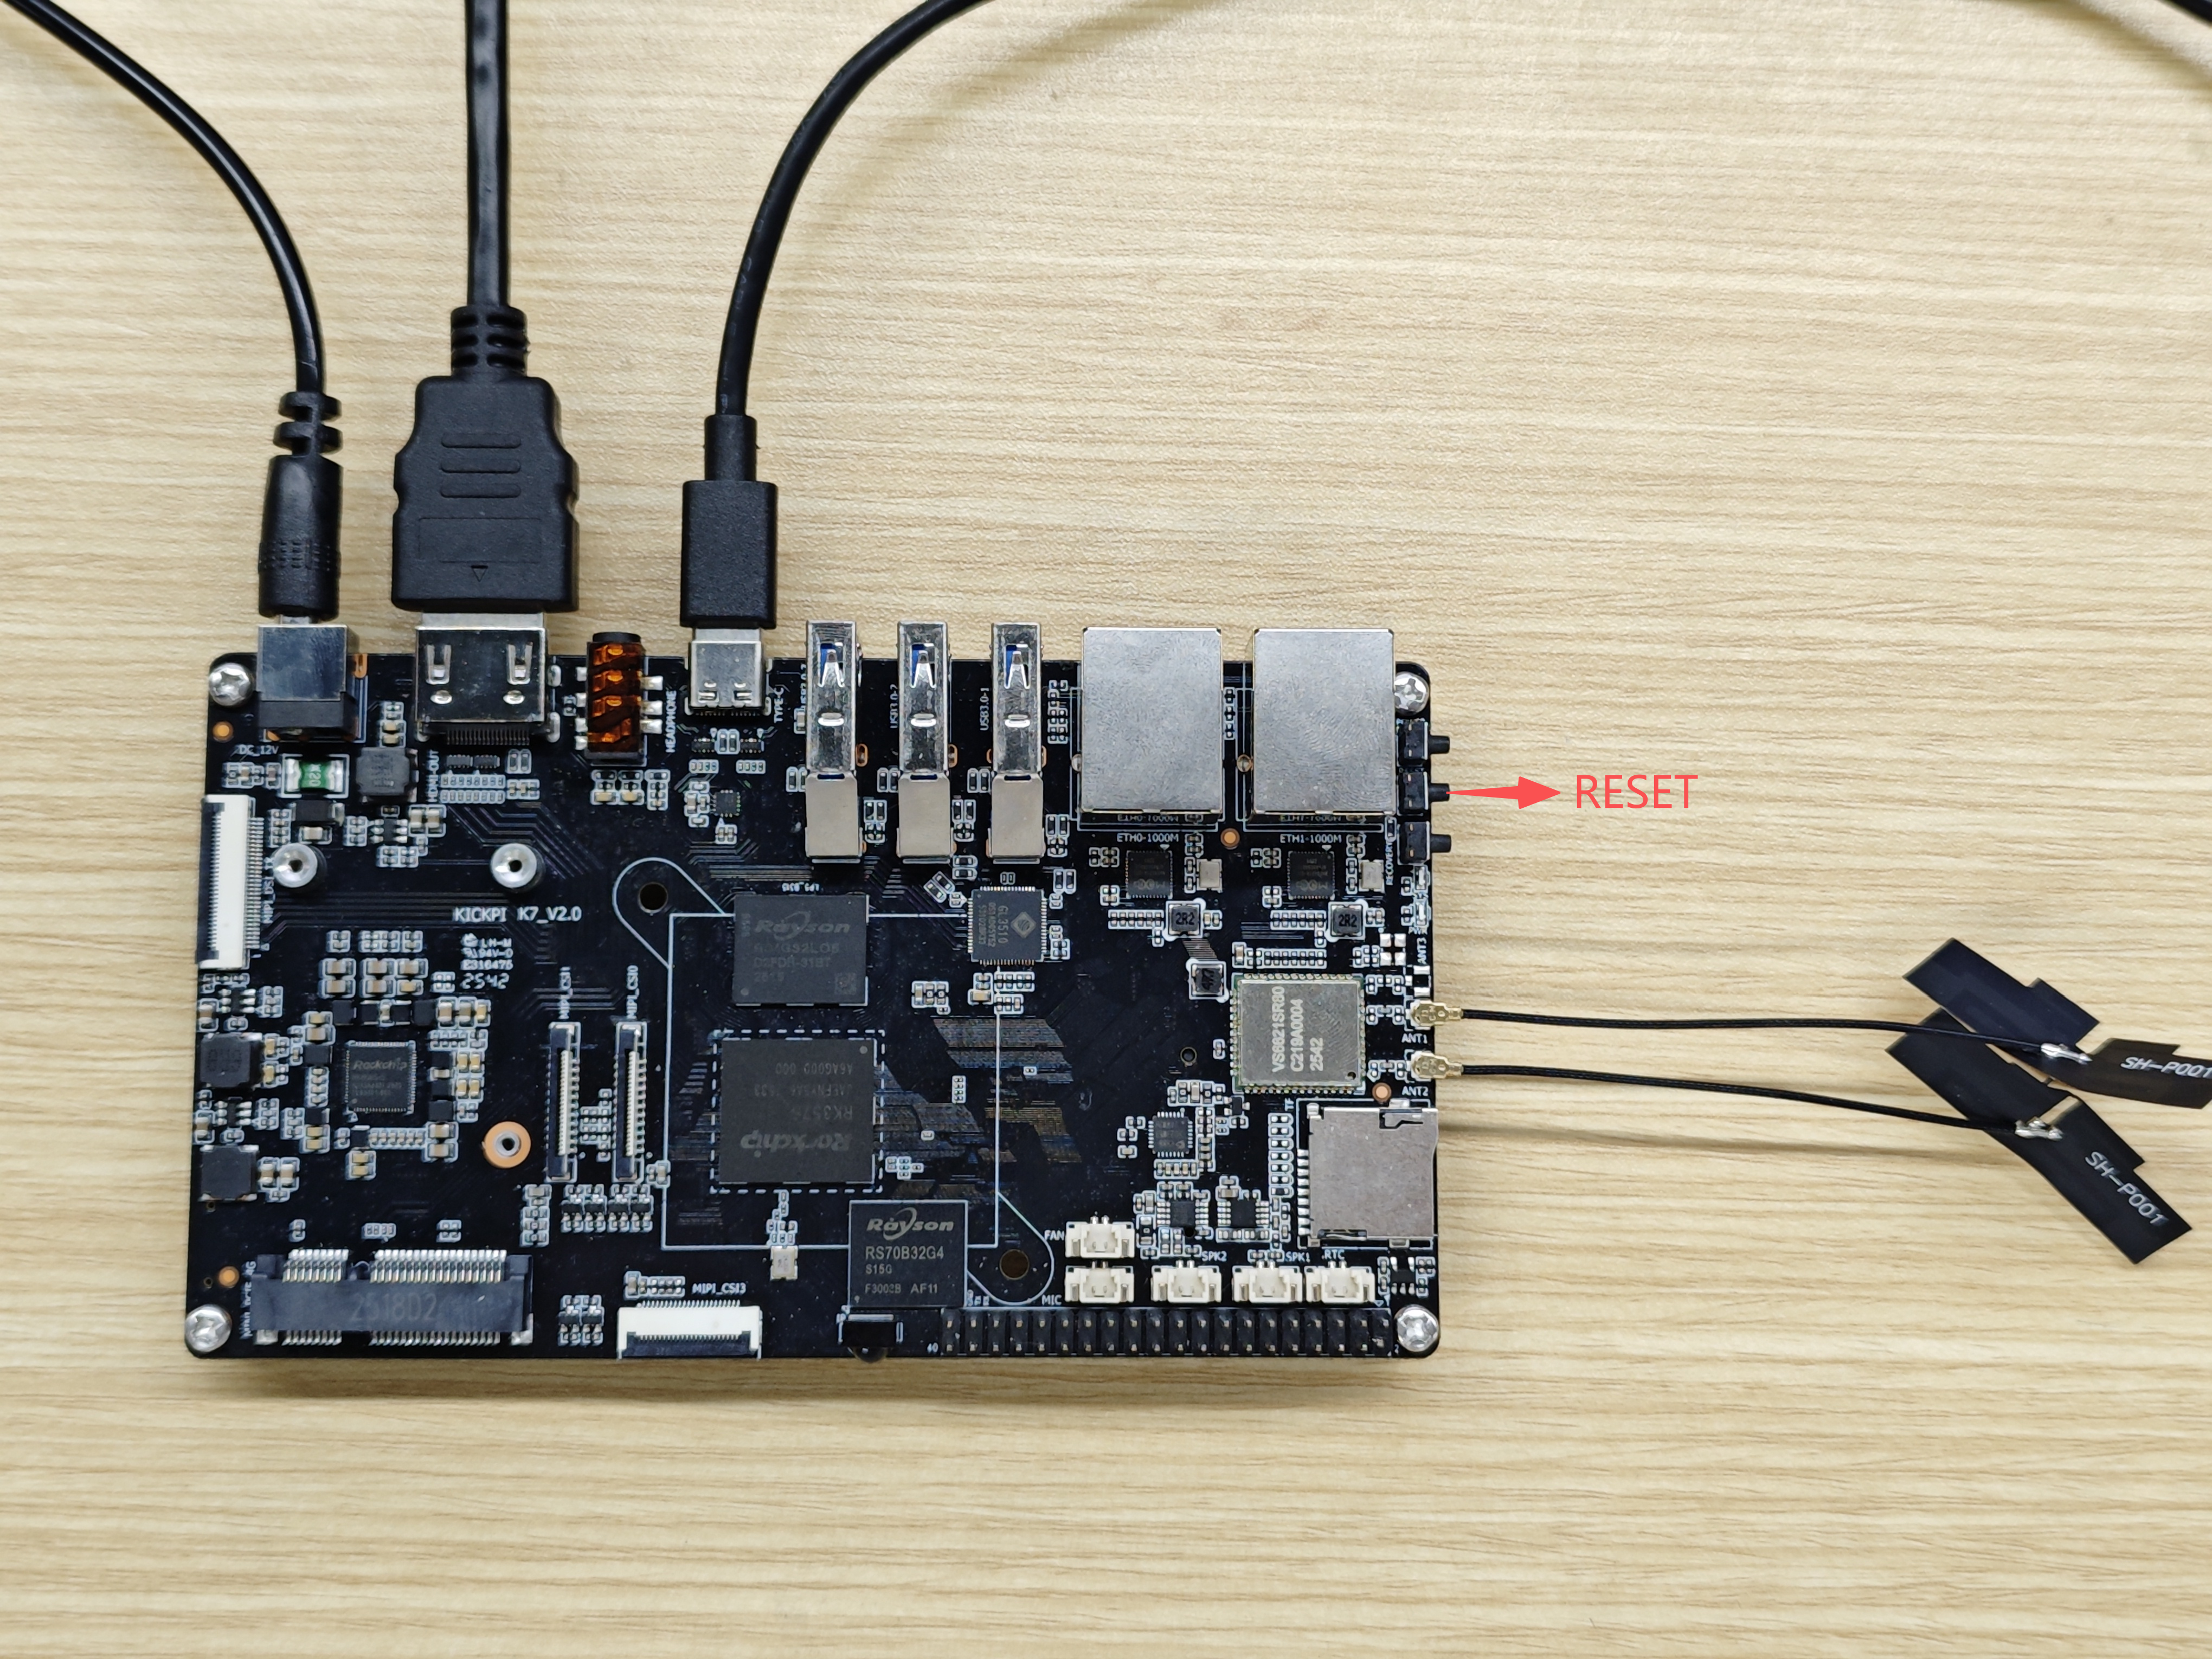
Hardware Installation
- Hardware: Windows PC/laptop,independent power adapter , HDMI Display (optional), USB TYPE-C cable(some cheap TYPE-C cable only provide current, make sure use the one capable of data exchange). some users reported when using double male TYPE-C to TYPE-C cable, installation failed sometimes, when switch to double male USB TYPE-A to TYPE-C, it's ok.
Tip
Connecting a display makes it easier to check whether the image installation is successful. K7 / K7C supports multiple display connections, only HDMI connection is demonstrated here.
Installation Steps
- Download USB driver DriverAssiant, open DriverInstall.exe in the extracted folder. Click to Install Driver.

- Download RKDevTool, open RKDevTool.exe in the extracted folder.

- Press MASKROM button and hold, don't let loose, plug in 12V DC, Connect board and PC/laptop with USB TYPE-C cable. when RKDevTool show “Found One MASKROM device” in status bar, RKDevTool setup talk with board. let loose MASKROM button.
Note
There are two ways to put board into MASKROM mode:
When board is powered off, press and hold the MASKROM button (don't let loose), apply power. The green LED will be steady on, connect the USB cable, after RKDevTool detected one MASKROM device, let loose MASKROM button,
When board is in power on state, press and hold the MASKROM button (don't let loose), then short press the RESET button once, after RKDevTool detected one MASKROM device, let loose MASKROM button

- Select image file and install.
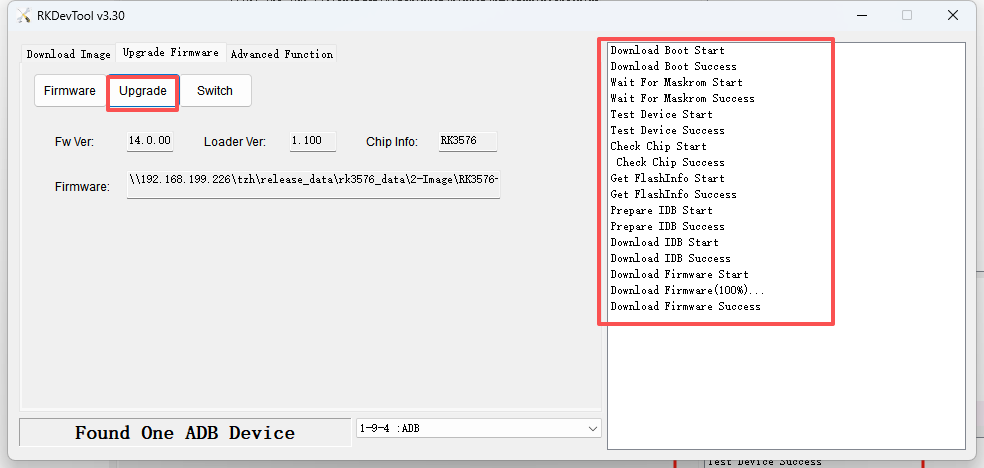
1. Click Upgrade Firmware to switch to the second tab, click Firmware, select the target image from where you saved it to install. Usually the image name start with prefix "update" , e.g. update-*.img.

2. Click Upgrade, right text view will show installing details.
Success
If the board is connected to a display, board will reboot automatically after installing is done, wait for the board to show the desktop
If installing without display, you can't see the reboot process, check the LED status: green LED steady on, blue LED keep blinking! During installing, blue LED is off all the time. so when it starts blinking, means board reboot over.
SD Card installation
K7 / K7C has a SD card slot ( microSD aka. TransFlash or TF ) which can also serves as a bootable device. In K7 / K7C's boot sequence, SD card has higher priority, so K7 / K7C always try to boot from SD card first, when no one mounted, K7 / K7C then boot from on-board eMMC. Since SoC vendor's official Tools use terminology SD(microSD) instead of TF, so we use SD card in this context, TF and SD means the same thing.
With SoC vendor's tool, we can make 2 types of booting card. SD Boot Card works like a portable edition OS, e.g. windows PE. We use SD Boot Card to power device for some maintain and fix purpose. also can be used to verify your own customization. the second type is SD installation card. you create this kind of booting card when you try to use it to install new Image into on-board eMMC. it contains a specific script to create partition, format FS, copy files to eMMC. Make sure you understand what you need and create the right SD card.
Note
Supported SD card filesystem formats: exfat, NTFS
SD Boot Card (SD Boot): Contains bootloader and complete system image, supports device booting directly from microSD card, used in scenarios like eMMC, dev debugging.
SD Installation Card (Upgrade Firmware): Stores firmware image and installation script, used to install or upgrade firmware to the device's on-board storage (e.g., eMMC).
- Download SDDiskTool, open SD_Firmware_Tool.exe in the extracted folder, mount TF card to your PC/laptop(via some card reader).
Note
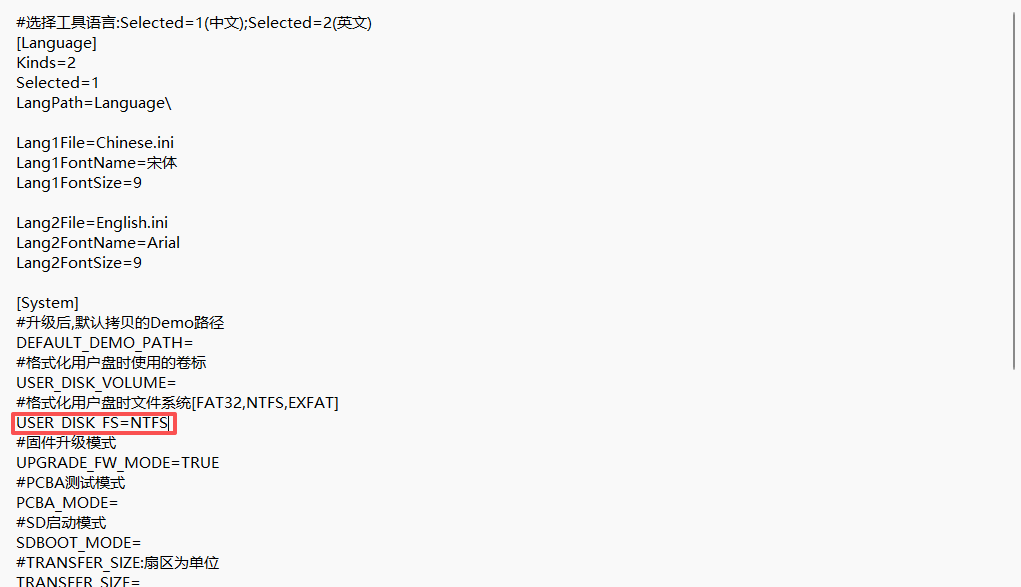
SDDiskTool default display language is Chinese. To change to English, find the config.ini file as shown below, change Selected=1 under [Language] to Selected=2, save, and restart SDDiskTool.

Note
Installation failure may occur if your SD card has a capacity larger than 16GB. Please modify SDDiskTool_v1.74/config.ini, specify the format as NTFS, save, and restart SDDiskTool.
SD Boot Card
Boot sequence is When both on-board eMMC and the SD Boot Card/SD installation Card contain OS systems, the system boot from SD card.
Warning
The Android system currently does not support booting from a TF card.
eMMC erase
Note
When the on-board eMMC has been pre-installed with the Android operating system, and the SD card has been flashed with another Linux system and you attempt to boot from the SD card, the boot process will fail. The reason is that the device's boot procedure prioritizes booting into the U-boot bootloader on the on-board eMMC — when no mountable SD card is detected, the device directly loads the kernel and rootfs from the on-board eMMC; when an external SD card is detected, the U-boot on the on-board eMMC will try to transfer control to the U-boot on the SD card. However, the Linux system comes with a different version of the bootloader (U-boot), which is incompatible with the U-boot version on the on-board eMMC, and the latter cannot load the Linux's U-boot. In this case, we need to erase the existing system on the on-board eMMC.
1. Download USB driver DriverAssiant, open DriverInstall.exe in the extracted folder. Click to Install Driver.
2. Run RKDevTool,power off board, press and hold RECOVER button, don't let loose, power on, RKdevTool status bar show Found One LOADER Device,let loose RECOVER button.

3. Choose Advanced Function tab, click EraseAll,this Action will erase data from on-board eMMC.

4. Left text view show erased。

Step1. Create SD Boot Card
1. Installation failure may occur if your SD card has a capacity larger than 16GB. Please modify SDDiskTool_v1.74/config.ini, specify the format as NTFS, save, and restart SDDiskTool.
2. Download image, Follow the steps shown in the diagram to operate.
├── Android14       // Android 14 Tablet Desktop Image
├── Armbian         // Armbian Ubuntu2404 Image
├── Debian12        // Debian12 xfce Desktop Image
└── Ubuntu2404      // Ubuntu2404 xfce Desktop Image
Note
During the creation of the SD Boot Card, SDDiskTool will ask if format the SD card, choose yes. When SD card formatting is over, it may prompt "burning failed" or "writing loader failed!", simply dismiss the dialog and recreate disk. This tool is a Rockchip official tool and has some minor bugs.

3. SD Boot Card creation completed.
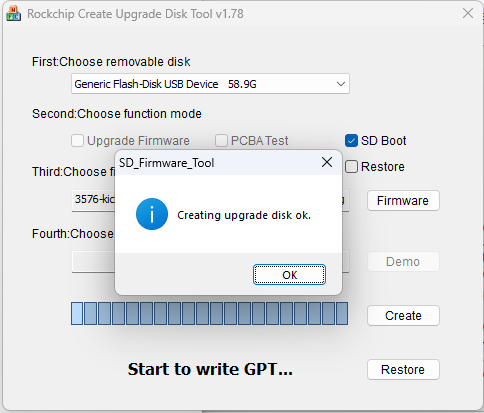
4. Power off board, connect display, insert the SD Boot Card, power on again, check if board booting from SD boot card.
Note
During the first boot, display may stay on the ROCKCHIP KERNEL LOGO screen for a long time (approximately 2~5 minutes). In the waiting, display may also turn off and on repeatedly, which is normal. Please wait patiently for booting into desktop.
SD Installation Card
Note
The OS image on SD Installation Card will automatically overwrite the image on eMMC.
If SDDiskTool shows formatting failure, please read the Q&A chapter below.
1. Installation failure may occur if your SD card has a capacity larger than 16GB. Please modify SDDiskTool_v1.74/config.ini, specify the format as NTFS, save, and restart SDDiskTool.
2. Follow the steps below. all like above chapter of creating SD boot card, ONLY that in step 2 , choose Upgrade Firmware instead of choosing SD Boot.

3. SD Installation Card creation completed.
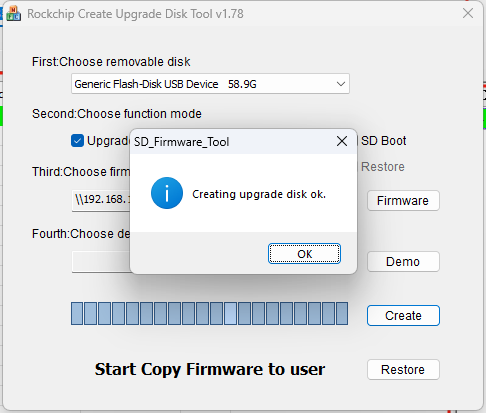
3. Power off board, connect the display, insert the SD Installation Card, power on again. Display will show an installation progress bar and text like "check userdata/oem partition success".
Success
When installation is done, display will show "Please remove SD CARD!!!,wait for reboot". At this point, remove the SD card, wait for the system to reboot (for the first system boot, it may last several minutes, do not power off device, wait board boot into the desktop normally).
When no display is connected, after the blue and green LEDs are both steady on, remove the TF card, when removed, board will automatically reboot, and the blue LED will keep blinking after reboot .
Armbian Image Installation
Armbian as an exception does not share the same USB installation steps with other OS.
Obtaining Armbian Image Package
Download Kickpi K7 / K7C image package from OneDrive. Armbian image package include 3 files(sometimes include another Image without desktop, so may be 4 files). First one is Armbian-unofficial_XXX.img, this is system img. The second one is armbian.cfg , which is a partition config file been fed to RKDevTool to do eMMC partition actions. The third one is MiniLoaderAll_rk3576.bin . All 3 files MUST be downloaded to install Armbian image to on-board eMMC.
USB Installation
Install Armbian image to on-board EMMC via USB TYPE-C (To boot Armbian system from SD card, please read SD Boot Card.
Hardware Installation
- Hardware: Windows PC/laptop, DC 12V, HDMI Display (optional), USB TYPE-C cable(some cheap TYPE-C cable only provide current, make sure use the one capable of data exchange). some users reported when using double male TYPE-C to TYPE-C cable, installation failed sometimes, when switch to double male USB TYPE-A to TYPE-C, it's ok.
Tip
Connecting a display makes it easier to observe whether the image installation is successful. K7 supports multiple display connections, only HDMI connection is demonstrated here.
Installation Steps
- Download USB driver DriverAssiant, open DriverInstall.exe in the extracted folder. Click to Install Driver.
- Download RKDevTool, open RKDevTool.exe in the extracted folder.
- Press MASKROM button and hold, don't let loose, plug in 12V DC, Connect board and PC/laptop with USB TYPE-C cable. when RKDevTool show “Found One MASKROM device” in status bar, RKDevTool setup talk with board. let loose MASKROM button.
Note
There are two ways to put board into MASKROM mode:
When board is powered off, press and hold the MASKROM button (don't let loose), apply power. The green LED will be steady on, connect the USB cable, after RKDevTool detected one MASKROM device, let loose MASKROM button.
When board is in power on state, press and hold the MASKROM button (don't let loose), then short press the RESET button once, after RKDevTool detected one MASKROM device, let loose MASKROM button.
- Not like Android, And other Linux distro, we can't install Armbian simply as a whole image. please read the following details.
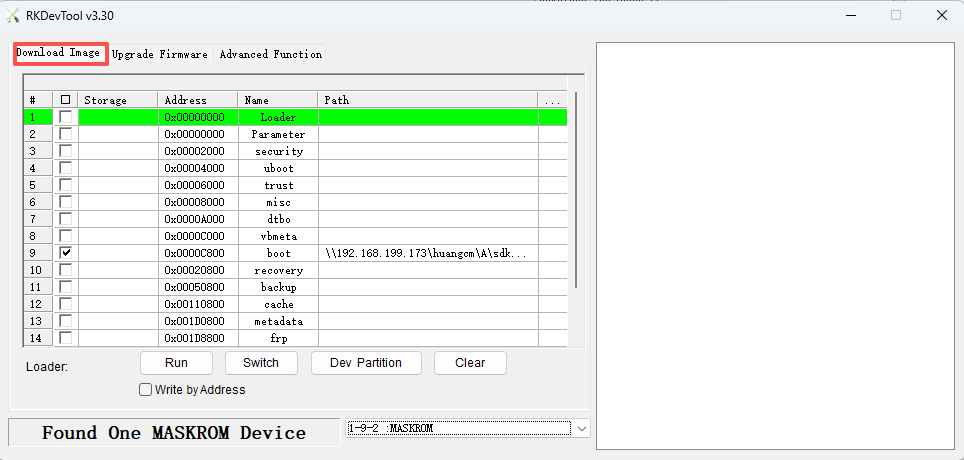
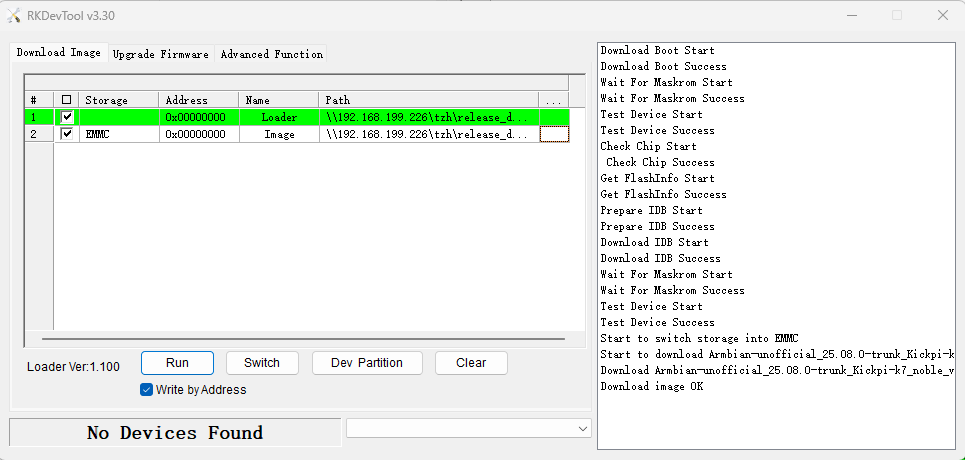
1. Click Download Image to switch tab page. you can see a lot partitions In the partition table area, e.g. Loader, Parameter, etc.
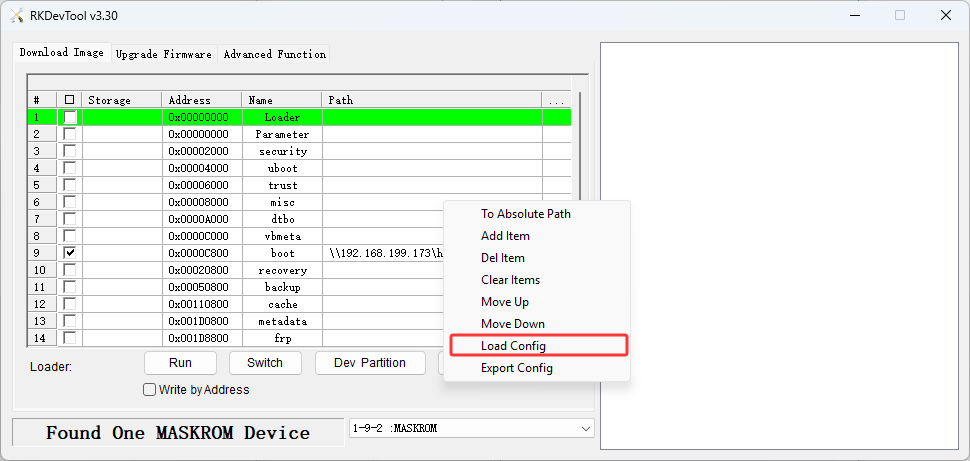
2. Right-click anywhere inside the partition table area to open pop-up MENU, in the MENU, click Load Config, and then select the armbian_*.cfg you downloaded from cloud disk.
3. After load config to apply armbian.cfg, partition table area changed to reflect the config inside armbian.cfg, there are only two partitions left(Loader and Image). we need to specify img/bin for each partition. First we specify img/bin for loader partition, click the area tagged as (1) , choose MiniLoaderAll_rk3576.bin file.
Note
You might notice that armbian image and miniloader share the same start address. why is that? MiniLoaderAll_rk3576.bin is NOT actually used when Armbian been installed on eMMC, it's mere usage is as a temp salve client to help RKDevTool to install armbian Image to eMMC. First, RKDevTool install miniloader, miniloader been loaded to memory and talk with RKDevTool to install armbian image, overwrite the space where miniloader occupied. that's why when we make Armbian SD boot card, we don't need miniloader.

4. Select Image partition image file, click the area tagged as (2), select the Armbian-*.img image file.

5. Check both lines‘ checkboxes as shown in diagram and also check Write by Address option (Must be checked!).
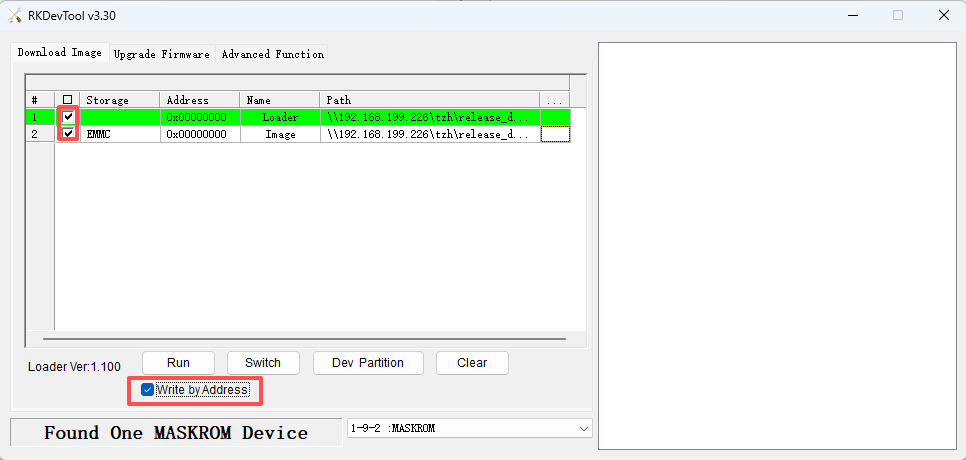
6. Click Run, start installing.
Success
If the board is connected to a display, board will reboot automatically after installing is done, wait for the board to show the desktop
If installing without display, you can't see the reboot process, check the LED status: green LED steady on, blue LED keep blinking! During installing, blue LED is off all the time. so when it starts blinking, means board reboot over.
SD Boot Card
eMMC erase
Note
When on-board eMMC has already been installed with other OS , e.g. ubuntu, Debian, Android,SD card has been installed Armbian and need to boot from SD , it will fail. the reason is the boot procedure will first boot into on-board eMMC's U-boot, when NO SD card mounted, board directly load on-board eMMC's kernel and rootfs. When external SD card mounted, on-board eMMC's U-boot will try to transfer control to U-boot on SD card, but Armbian has the newest bootloader(U-boot) version which is not compatible with older version U-boot, older version U-boot can not load Armbian's U-boot . In this case,we need to erase on-board eMMC's system.
Step
1.Download USB driver DriverAssiant, open DriverInstall.exe in the extracted folder. Click to Install Driver.
2. Run RKDevTool,power off board, press and hold RECOVER button, don't let loose, power on, RKdevTool status bar show Found One LOADER Device,let loose RECOVER button.
3. Choose Advanced Function tab, click EraseAll,this Action will erase data from on-board eMMC.
4. Left text view show erased。
Step1. Create SD Boot Card
Preparations
- Hardware: SD Card (recommended capacity ≥16GB), TF(SD) Card Reader.
- Software: SD card maker tool balenaEtcher, Armbian image.
Steps
1. Connect Storage Card: mount the SD card into the computer via the card reader.
2. Launch Software: Open the installed balenaEtcher as Administrator user.
3. Select Image: Click "Flash from file", select the downloaded Armbian-*.img system image file.
4. Select Target: Click "Select target drive", choose the SD card device you just mounted.
5. Start Flashing: After confirming the information is correct, click "Flash!".

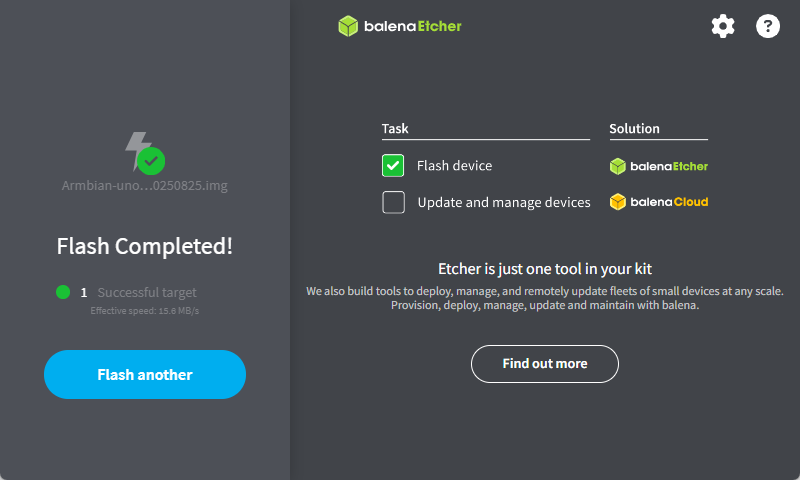
6. Installation Complete: Wait for Flash Completed notification, then close the window.
If the image is undamaged and the situation shown in the diagram occurs, the issue may be poor contact of the USB port; please replace the USB port and try again.

Step2. Boot Device Using SD Card
Note
First Boot Guide
1. Be Patient: After the first power-on, the system will automatically perform initialization configuration. Do not power off or restart during this process.
2. Completion Sign: When the screen displays the graphical desktop or command-line login prompt, it indicates boot is over.
1. Power Off Device: Ensure target board is powered off.
2. Insert Boot Card: Insert the created SD Boot Card into slot.
3. Power On and Boot: Apply power to the device, the system will begin booting from the SD card.
4. Wait for Boot Completion: The first boot may take several minutes for initialization, please wait patiently for the system to enter the desktop.
Factory Installation
Factory installing is used for mass production mode, in this scenario, a guy can install multiple devices at the same time with the same PC(Armbian images do not support Factory installation.).
Note
In factory installing mode, you need a USB hub to host multiple USB connection, each USB connection could install one device, so multiple double male USB cables also needed.
- Download FactoryTool_v1.89.zip and install it.
Open FactoryTool.exe from the extracted folder. It's a portable version tool.

Software running inteface:

- Installing the image:
1. Click Firmware and select the image to be flashed; click Run to start factory flashing mode.

2. Click upper-right Skeuomorphic style button , button color turn green.
3. Put the board into MASKROM Forced Installation Mode and connect the board using a Type-C cable. when device found, let loose MASKROM button.
Note
MASKROM Forced Installation Mode:
Method 1: When device is powered off: Press and hold the MASKROM button (don't let loose), then power on the device. green LED will light on at this moment, connect the USB cable. when RKDevTool show “Found One MASKROM device” in status bar, RKDevTool setup talk with device. let loose MASKROM button.
Method 2: When device is powered on: Press and hold the MASKROM button (don't let loose), then press the RESET button and release. when RKDevTool show “Found One MASKROM device” in status bar, RKDevTool setup talk with device. let loose MASKROM button.
4. When FactoryTool detects the device, installing start with the progress bar show RED color.

5. When installing is over and everything ok, progress bar's color turn green. Repeat steps 2, 3, and 4 to install other devices simultaneously.
6. After flashing all devices, Click upper-right Skeuomorphic style button to RED state.
Q&A
Cause: SD cards larger than 32GB require the NTFS file system.
Solution: Modify SDDiskTool_v1.74/config.ini to specify the format as NTFS.
- Armbian image flashing failure issue?
If you encounter the following boot failure message, it indicates a failure during Armbian image flashing, and the process cannot continue.
 Solution:
Step 1: Flash an Android / Linux full package image to restore the system.
Step 2: Retry the Armbian image flashing process.