Installing Operating System
By default, the rk356x-rk3588 Series Boards have on-board eMMC and boot from eMMC directly. If you need to replace the system on eMMC or want to sideload another OS from other storage devices (e.g., microSD card), please read this chapter and proceed.
Warning
The Android system currently does not support booting from a TF card.
Obtaining Image
Obtain the rk356x-rk3588 series images.
├── RK3562-K3
├── RK3566-TX66
├── RK3568-K1
├── RK3568-K1B
├── RK3588-K8
├── RK3588-K11C
└── UPDATE_LOG.txt
USB Installation
Install the image to the board's eMMC via USB Type-C. (For system installation or booting from a TF card, please refer to the following content.)
Preparation
- Hardware: Windows PC/Laptop, HDMI display (optional), Power adapter, USB flashing cable.
- Software: USB driver DriverAssitant, Installing tool RKDevTool, Image file.
Installation the USB Driver 
1. Go to the extracted directory of DriverAssitant_v5.13.zip and run DriverInstall.exe. Click "Driver Install". A prompt will indicate successful installation.
Tip
If an older driver version is already installed, uninstall it first and then install the new driver to ensure the latest version is used.

Installation RKDevTool 
1. Navigate to the RKDevTool unzipped directory and run RKDevTool.exe.

2. (Optional Operation) Change the RKDevTool default language (Optional). The default interface language is Chinese. Refer to the following steps to change it to English.

Installing Steps
1. Connect the USB flashing cable, Run RKDevTool and go to the Upgrade Firmware tab.
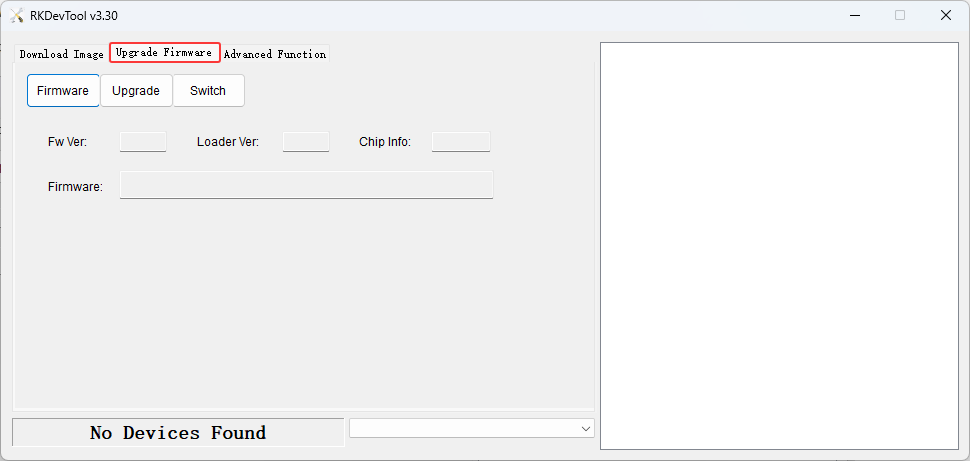
2. Make the board enter LOADER Mode or MASKROM Mode.
Note
MASKROM Mode: Typically used for forced image flashing after system damage.
LOADER Mode: Typically used for full image flashing and partition flashing.
When the board is powered off, press and hold the MASKROM (on the back of the board)/RECOVERY button, power on the board and connect the USB flashing cable. Release the MASKROM / RECOVERY button once RKDevTool detects the MASKROM / LOADER device.
When the board is powered on, plug in the USB flashing cable, press and hold the MASKROM (on the back of the board) / RECOVERY button, then press the RESET button briefly. Release the MASKROM/ RECOVERY button once RKDevTool detects the MASKROM / LOADER device.
3. Once RKDevTool recognizes the LOADER or MASKROM device, release the buttons.

4. Click Upgrade Firmware to go to the firmware upgrade interface. Click Firmware and select the image to flash.

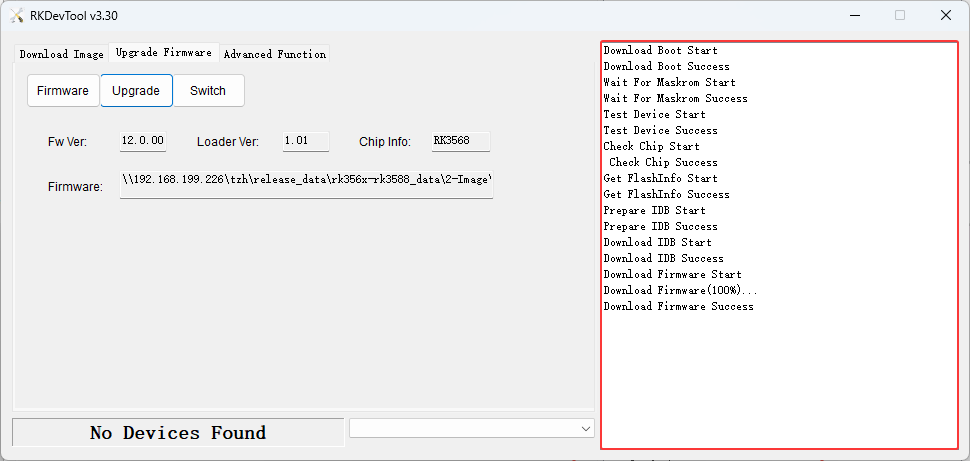
5. Click Upgrade and wait for the flashing process to complete.

6. Installation completed, wait for the board to restart.
Success
When a display is connected to the board, do not power off the board immediately after installation completes – the system will boot up automatically. Please wait for the system to load the desktop normally!
When no display is connected to the board, do not power off the board immediately after installation completes – the system will boot up automatically and the LED status will change, with the green LED staying solid on and the blue LED flashing continuously!
SD Boot Card
K1 has a SD card slot ( microSD aka. TransFlash or TF ) which can also serves as a bootable device. In K1's boot sequence, SD card has higher priority, so K1 always try to boot from SD card first, when no one mounted, K1 then boot from on-board eMMC. Since SoC vendor's official Tools use terminology SD(microSD) instead of TF, so we use SD card in this context, TF and SD means the same thing.
With SoC vendor's tool, we can make 2 types of booting card. SD Boot Card works like a portable edition OS, e.g. windows PE. We use SD Boot Card to power device for some maintain and fix purpose. also can be used to verify your own customization. the second type is SD installation card. you create this kind of booting card when you try to use it to install new Image into on-board eMMC. it contains a specific script to create partition, format FS, copy files to eMMC. Make sure you understand what you need and create the right SD card.
Preparation
- Hardware: Windows PC/Laptop, HDMI display (optional), SD card, SD card reader.
- Software: SDDiskTool, Image file.
Warning
The Android system currently does not support booting from a TF card.
SDDiskTool Installation
1. Navigate to the extracted SDDiskTool.zip directory and run SD_Firmware_Tool.exe.

2. (Optional Operation) SDDiskTool defaults to Chinese. The default language can be changed by modifying config.ini in the extracted SDDiskTool directory.
Note
Selected=1 (Chinese); Selected=2 (English)
Installing Steps
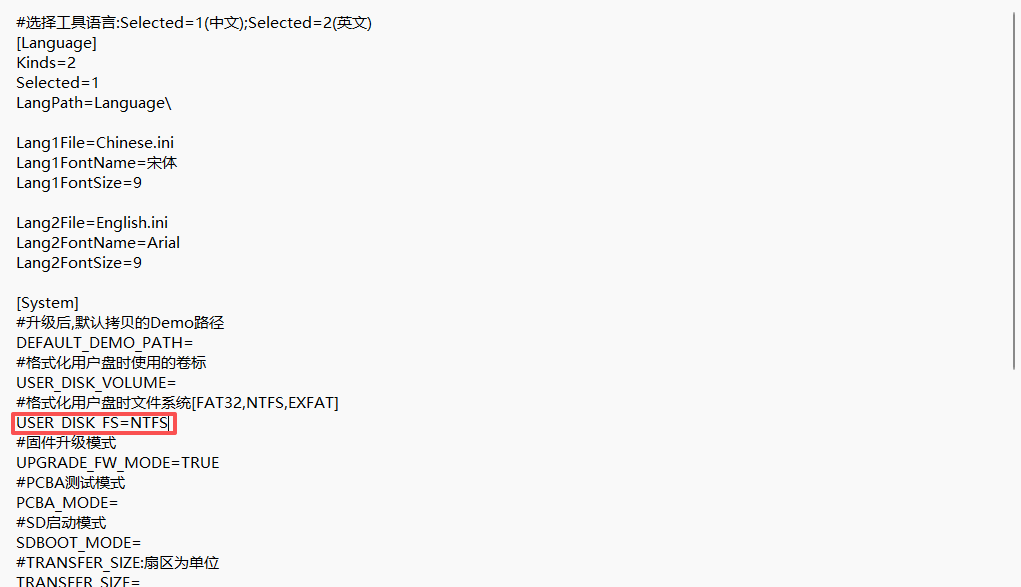
1. If your SD card is larger than 16GB, installation failure may occur. Please modify the file SDDiskTool/config.ini, specify the formatting format as NTFS, save the changes, and then restart SDDiskTool.
2. Create an SD boot card and follow the steps shown in the diagram to operate.
Note
During the creation of the SD Boot Card, SDDiskTool will ask if format the SD card, choose yes. When SD card formatting is over, it may prompt "burning failed" or "writing loader failed!", simply dismiss the dialog and recreate disk. This tool is a Rockchip official tool and has some minor bugs

3. As shown in the diagram, the SD boot card is created successfully.

4. Power off the board, insert the SD card into the board, power it on again, and check if the display loads the desktop normally.
Note
When Ubuntu boots from the SD boot card for the first time, it may stay in the command line interface for a long time (about 5 minutes) due to the SD card transfer speed. Please wait patiently for the Ubuntu system to load the desktop. When shutting down the Ubuntu system on the SD boot card for the first time, do not power off the board directly or reset it via the RST button, as this may cause it to stay in the command line interface for a long time on subsequent boots. Please shut down the system using the shutdown function in the graphical interface.
SD Installation Card
K1 has a SD card slot ( microSD aka. TransFlash or TF ) which can also serves as a bootable device. In K1's boot sequence, SD card has higher priority, so K1 always try to boot from SD card first, when no one mounted, K1 then boot from on-board eMMC. Since SoC vendor's official Tools use terminology SD(microSD) instead of TF, so we use SD card in this context, TF and SD means the same thing.
With SoC vendor's tool, we can make 2 types of booting card. SD Boot Card works like a portable edition OS, e.g. windows PE. We use SD Boot Card to power device for some maintain and fix purpose. also can be used to verify your own customization. the second type is SD installation card. you create this kind of booting card when you try to use it to install new Image into on-board eMMC. it contains a specific script to create partition, format FS, copy files to eMMC. Make sure you understand what you need and create the right SD card.
Preparation
- Hardware: SD card, SD card reader.
- Software: SDDiskTool, Image file.
SDDiskTool Installation
1. Navigate to the extracted SDDiskTool_v1.78.zip directory and run SD_Firmware_Tool.exe.
2. SDDiskTool's UI use Chinese language as default. The default language can be changed by modifying config.ini in the extracted SDDiskTool_v1.74 directory.
Note
Selected=1 (Chinese); Selected=2 (English)
Installing Steps
1. If your SD card is larger than 16GB, installation failure may occur. Please modify the file SDDiskTool/config.ini, specify the formatting format as NTFS, save the changes, and then restart SDDiskTool.
2. Create an SD Installation card and follow the steps shown in the diagram to operate.

3. As shown in the diagram, the SD Installation card is created successfully.

4. Wait for the installing process to complete and check if it was successful. If successful, remove the SD card and restart the board.
Success
When installation is done, display will show "Please remove SD CARD!!!,wait for reboot". At this point, remove the SD card, wait for the system to reboot (for the first system boot, it may last several minutes, do not power off device, wait board boot into the desktop normally).
When no display is connected, after the blue and green LEDs are both steady on, remove the TF card, when removed, board will automatically reboot, and the blue LED will keep blinking after reboot .
Factory Flashing
Factory flashing is used for batch flashing during production, allowing multiple boards to be flashed simultaneously.
Preparation
- Hardware: Power adapter, USB flashing cable.
- Software: USB driver DriverAssitant, flashing tool FactoryTool, Image file.
Installation the USB Driver 
1. Go to the extracted directory of DriverAssitant_v5.13.zip and run DriverInstall.exe. Click "Driver Install". A prompt will indicate successful installation.
Tip
If an older driver version is already installed, uninstall it first and then install the new driver to ensure the latest version is used.
Installing FactoryTool
1. Extract FactoryTool_v1.89.zip and open the extracted folder,Run FactoryTool.exe.

Installing Steps
1. Click Firmware and select the image to flash; Click Run to start factory flashing mode.

2. When the FactoryTool upper right corner indicator is green, connect the board using the flashing cable.
3. Make the board enter LOADER Mode or Maskrom Mode.
Note
MASKROM Mode: Typically used for forced image flashing after system damage.
LOADER Mode: Typically used for full image flashing and partition flashing.
When the board is powered off, press and hold the MASKROM (on the back of the board)/RECOVERY button, power on the board and connect the USB flashing cable. Release the MASKROM / RECOVERY button once RKDevTool detects the MASKROM / LOADER device.
When the board is powered on, plug in the USB flashing cable, press and hold the MASKROM (on the back of the board) / RECOVERY button, then press the RESET button briefly. Release the MASKROM/ RECOVERY button once RKDevTool detects the MASKROM / LOADER device.
4. Observe the FactoryTool indicator status. When a device is recognized, it switches to red. Do not unplug or plug in devices at this time.
5. After successful flashing, the FactoryTool indicator turns green. Repeat steps 2, 3, and 4 to flash new boards simultaneously.

6. After all device images are flashed, click Stop.
Q&A
Cause: SD cards larger than 32GB need to use NTFS file system format.
Solution: Modify SDDiskTool_v1.74/config.ini, specify the format as NTFS, save, and restart SDDiskTool.